Using Adapted Books Effectively for Special Education in Classroom or Distance Learning!

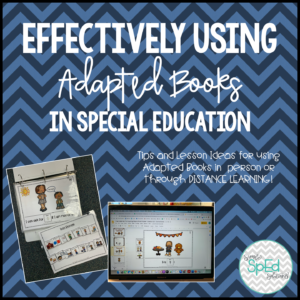
Most Special Educators or Early Educators (Pre-K/K/1) teachers I know LOVE a good adapted book. But what do you do with these things? Just read them? Set them in front of your student and hope they participate?  

Like most things with our students, the engagement with these books must be taught, but once you teach it, these adapted books are an awesome tool to help build vocabulary, increasing sentence length, or even as an engaging social story to help practice and learn behavior basics.

How to Teach with Adapted Books:

There are a few ways you can practice and increase your student engagement with these books. When first introducing them to my students or with my lowest level learners, I will give errorless choices in a small group setting. For example, I present the page and read the sentence while filling in the blank with the word. Then I may ask “Who has the word “Yes!” The student will respond by handing over the icon to finish the sentence or placing it on the blank themselves if they are able.

I also can use these books in a 1-1 setting, even with students who need 1-2 choices. For example, when I used these books with students with MD who had limited arm movement, I would present the page to the student and read aloud. Then I would ask the student which word (icon) fits in the blank. I could place the icons farther apart on a choice board and have the student either move their arms or head to indicate which choice (also works for students who use eye gaze choices!)

In a larger group, you can give each student 1-3 icons to ‘hold onto’ for you. When you come to a blank you can either fill it in verbally and then ask “who has ___”. The students must look at their icons, determine if they have the correct one to fill in the blank, then raise their hand, and engage to answer! (That’s like 4 different skills with 1 activity)

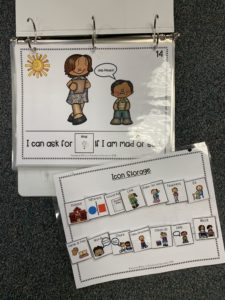
Students can also use these independently or in centers. You can simply collect all icons on one page *icon storage pages are provided in my books* and have the student go through the book, matching the correct icon to each page. 

What can you learn with adapted books?

There are 3 types of Adapted Books that I create:

Social Story/Behavior Basics
These books are the ones I use most often in my large groups. These books are written in the first or second person to create a social story feel and go over specific situations. The adapted nature of the books allow students to choose their response. Some of my favorites include: Our Recess Rules (practicing appropriate behaviors on the playground) and I Can Make Friends (social skills for making friends).
These also include specific scenarios that may be more difficult for our students, such as Fire Drills, Lockdown Drills, and Celebrating Holidays. They walk students through the scripts of what things in their environments may change and what to expect. Going over differences in routines and expectations before the event can drastically reduce the chance of problem behaviors!

Specific Skills
Occasionally I will make books to target specific skills. Books like the What, How Many, What Color practice skills of IDing Colors and animals, and counting to ten.  The What is Where book used items to practice common positional prepositions such as IN, ABOVE, ON, UNDER, etc!

Informative/Lessons

The last type of book I create are ones that are intended to tell a story or lesson about a person or event. For example, our Black History Month series teaches about the lives of Ruby Bridges, Martin Luther King Jr, and Rosa Parks in an interactive and accessible way. The Community Helpers books teach lessons on types of helpers and their tools.

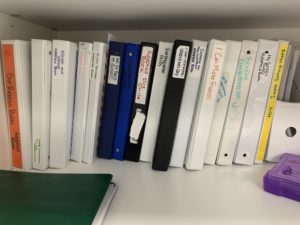
Once you determine your target teaching goals and pick your book, you can choose whether to use the book as a physical book or digital activity.  (This is my adapted book library, we do not have a binding machine so I keep them in binders!)

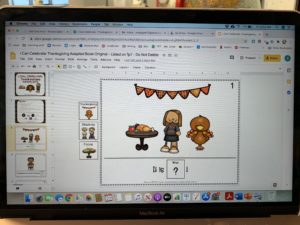
I had always used my adapted books as physical books for students who may need physical and visual icon choices, so when we moved to distance learning, I was hesitant to modify my books for use in my online classroom. However, I am SO glad I took that plunge. It took some time, but now we use adapted books ALL the time and we’re still full distance learning. If you have purchased one of mine in the past, you can re-download to get the Google Slides link for FREE!

One of my favorite ways to use them during ZOOM lessons (or Google Meets) during our speech consults. My SLP loves to see the students using the images to increase their sentence length and learn new vocabulary words. 

First, I will share my screen with a small group. I have placed 3 icons on the side of every page in the adapted book, one correct and 2 incorrect icons to choose from. You can copy and paste to add more or remove to create fewer choice options depending on the level of your students.  I will read through the sentence and ask the student to choose which icon fits in the blank. If the student can read on their own, they can! If the student is able to use “remote control” on the ZOOM app and drag it themselves, GO FOR IT! If you want the student to annotate and circle what they think is the correct answer, DO IT! The possibilities really are endless and they are so easy to adapt to each child’s learning needs. 

Don’t forget to browse my Adapted Book library HERE.

Did I miss anything?? How do you use Adapted Books in your classroom? Comment below!

Distance Learning Tips for your SpEd Classroom that WORK!

Distance Learning Title Image

Distance Learning.  It is the beast of burden for most teachers and families in America at the moment. From the first shut downs in March to starting the new year, almost every teacher and student has had to complete distance learning in some form or another. 

For our students with special needs and their families, this burden is especially high. Parents are put in the role of teacher, speech therapist, occupational therapist, behavior specialist, and paraeducators with little to no training! I honestly can’t imagine having little to no help at home, let alone having to work from home at the same time as having to provide full time care AND schooling for a child with different needs.  They are the true heroes here!

But let’s talk about YOU teachers. Especially those teachers who are NOT going back to the classroom yet.  Here in Northern California, our cases of COVID are still very high, and still climbing.  My district planned on a hybrid OR digital model, but then the entire county moved to digital learning until case count comes down.  While I am relieved that I will not be a potential transmitter of the disease into my family, I desperately miss teaching in my classroom, I know that they thrive in the environment we have set up for them.  

However, after a LOT of planning, preparing materials and packets, making online work and finalizing our google classroom, I can honestly say it is going MUCH BETTER than I expected! So here are some tips if you are new to the online teaching game or just need to shake things up. 

Tip 0: Build Family Connections

I wasn’t going to add this in as I have a whole separate post on this in my brain but I decided it is important and I need to share! Family connections are more important now than ever, especially if you have new students you’ve never met before.  Call parents, text them using Talking Points or RemindApp, send daily e-mails, update your website, have 1-1 Check ins. Let them know you are HERE for them! 

Distance learning is not right for everyone. Some families may drop out, some may fully move to homeschool or private school. Do NOT take it personally! That is NOT your fault! If you make the connections, try your best and have the best interests of the child and their families, they will see and appreciate you and your efforts.  Even as difficult as the process may be for us, it is equally, if not more, difficult for them. 

Tip 1:  MASTER SCHEDULE

A Master Schedule is essential for keeping yourself and your families sane.  Ours looks like this:

Our schedule is mainly dictated by our district.  Our district requires teachers to participate in a certain number of synchronous and asynchronous learning minutes per day based on the children’s ages and grades.  Unfortunately this requires a LOT of LIVE zoom/google meet sessions for our students with special needs.  But in a surprising turn of events, I actually had a LOT of parent and student buy so far!  How?  Keeping small groups short, keeping circle fun and engaging (share your screen and dance along to Koo Koo Kangaroo at the end of every circle, I guarantee they will come back for more!), and making things reasonable and clear for parents, especially if they have to sit through the whole online time with their student. 

If students are unable to make the live ZOOMs (due to parents working, etc), the worksheets are posted online in the google classroom as slides or parents are given a paper packet option (pick up/drop off each Friday). 

I also make sure my worksheets correspond to what my paras are teaching that day.  If students are in the Live Zooms and Small Groups, then they can simply finish the worksheets at that time! Easy! Done! No extra work! It works out to about 6 worksheets/activities per day. Sounds like a lot but pretty similar to what we were doing in our classroom.  If you want to assign less worksheets and more activities, you could plan your week to look something like this (this was for my upper level ESY group):

Tip 2:  Use your Paras!

I’ll admit it, my paraeducators are fantastic.  During the school year, I rarely have to create lesson plans for them because they follow the curriculum well, take great data, and know how to work with our kiddos.  

Since I need to plan our worksheets and packets a week in advance in order to get the packets to parents on time, I have been lesson planning for my paras.  It is a weird experience for them not having total autonomy over their lessons, so I try to give them as much flexibility as possible. Here is an example of my “lesson plans”. Currently my A/B groups are doing the same level work, and we have small group lessons 2x a day (morning and afternoon). 

We hold small groups through breakout rooms *more on that next*, because I need to be able to supervise all small groups- So currently I am not running one. 

Data is done as observation notes on a single sheet- they send to me later and I compile onto an excel doc for easy access.  This is NOT how I did data last year, but lets just say data for over 150 student goals is not feasible for distance learning, so we are improvising! it also helps me keep track of what is working and what isn’t.

Tip 3: Breakout Rooms

I was hesitant to use breakout rooms because I had heard horror stories about them not working, ruining the ZOOM, etc.  But it really is the easiest way to do small group rotations. 

We use my “personal meeting room” for all of our circle times and small groups.  It is ONE link that parents can just save to their desktops.  To create small groups, simply click the breakout room at the bottom of the ZOOM screen, how many rooms you want (3 for 3 small groups) and assign students and teachers/paras!  We have also been experimenting using an extra room for ‘pull out’ OT and speech services, saving parents the headache of finding and using multiple URLs.  Plus, I can “join” and “Leave” each group to check in, help out with tech, etc!

Tip 4: Google Classroom/ Slides

My Google Classroom was a mess until I organized everything into specific topics.  I also have each paraeducators worksheets separated so that they can open their files individually. You need to find what type of organizational method works for you, then stick to it!

google classroom organization

If you’re not using Google Slides in your classroom, are you even teaching online?!I know, some schools require you to use Schoology, or Seesaw or some other learning platform. But I am LOVING google classroom, the main reason being able to assign google slides.  If your students are in a pickle where they cannot print, can’t pick up packets, or simply need easy drag and drop activities similar to File Folder Games or Task Boxes, then using Google Slides is the way to go.  There are so many good tutorials on Youtube on

how to make your own ( Pocketful of Primary is my personal fave).  But there are also hundreds of new digitized Google Slides resources ALREADY MADE for you on TPT! You can also printscreen curriculum your district requires and make it interactive!

google slides description

Which brings me to:

Tip 5: DON’T Re-invent the Wheel!

Why spend hours creating a digital worksheet for something when there is ALREADY something perfect waiting for you! Before you spend hours making something yourself, Search GOOGLE, Use curriculum you already have, search Teachers Pay Teachers, etc!

Chances are, there are activities, worksheets, or slides already pre-made for you that can focus on that child’s IEP goals. If you’re looking for an easy way to start your year digitally, check out my Get Started Pack with 50 worksheets pre-made into Google Slides for digital OR paper packets! 

lets get started pack description

Whatever your district is doing this year, in person, hybrid, or fully distance learning, I know that is is not ideal.  Nothing is ideal right now with a nasty virus hanging over our country like a cloud.  There is no winning in any situation for teachers or the families and children they serve.  Try to stay positive, and know that you are doing the best you can! 

What other tips can you share for distance learning in your SpEd Classroom? Share below!

xSamantha